

Import your data
When you start, you can bring in your existing data in one go instead of entering it one by one. Gegevens importeren (import data) uses file templates and checks each row before writing anything.
| Menu | Configuratie › Gegevens importeren |
| Who | the administrator; another person only if the administrator gives them the import permissions (see below) |
| Prerequisites | your data in the Service Suite Excel or CSV template; the “parent” data already present (for example customers before their sites) |

In which order to import
Section titled “In which order to import”The screen offers ten data types. Import them in this order, because each one relies on the previous one: Artikelcategorieën (item categories), Artikelen en onderdelen (items and parts), Klanten (customers), Contactpersonen van klanten (customer contacts), Leveranciers (suppliers), Contactpersonen van leveranciers (supplier contacts), Locaties (sites), Installaties (installations), Onderhoudscontracten (maintenance contracts) and finally Beginvoorraad (opening stock).
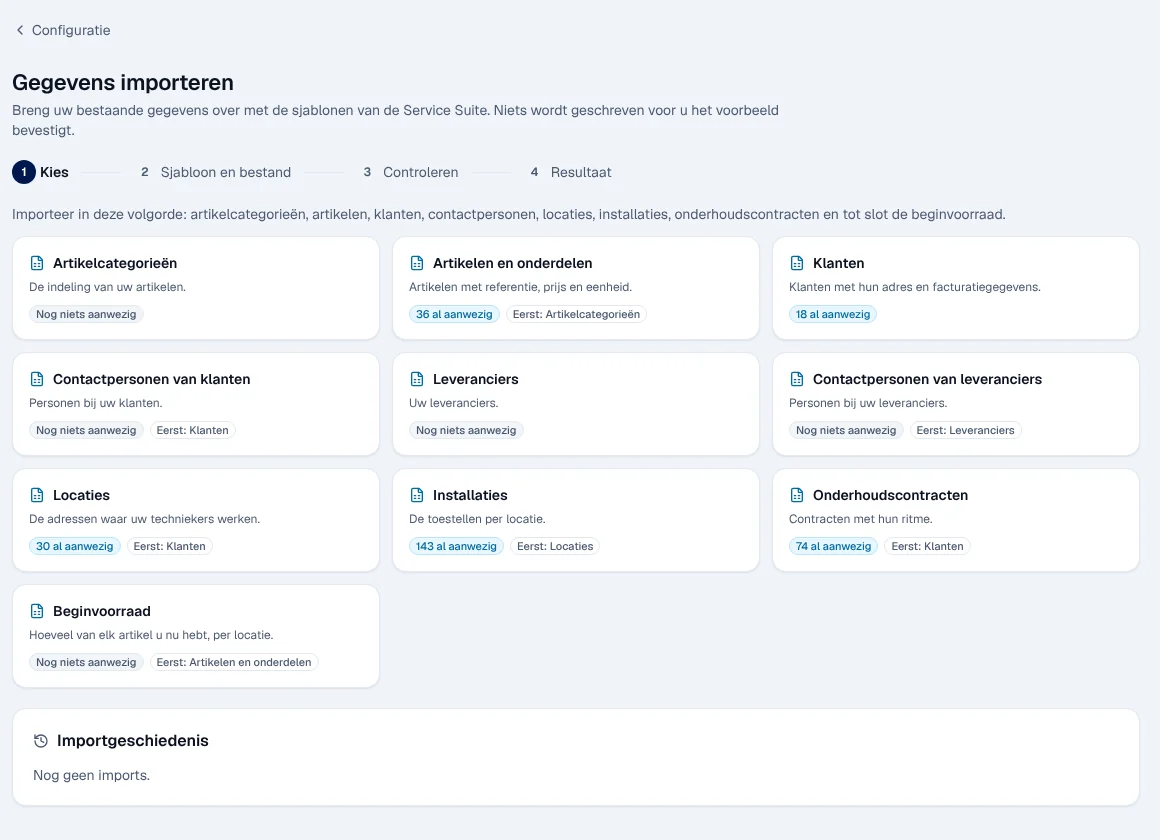
Each card shows what already exists (for example 18 al aanwezig, 18 already present, or Nog niets aanwezig, nothing yet) and what to import first (Eerst: Klanten, customers first).
Importing a file
Section titled “Importing a file”-
Kies (choose): click the data type, for example Klanten.
-
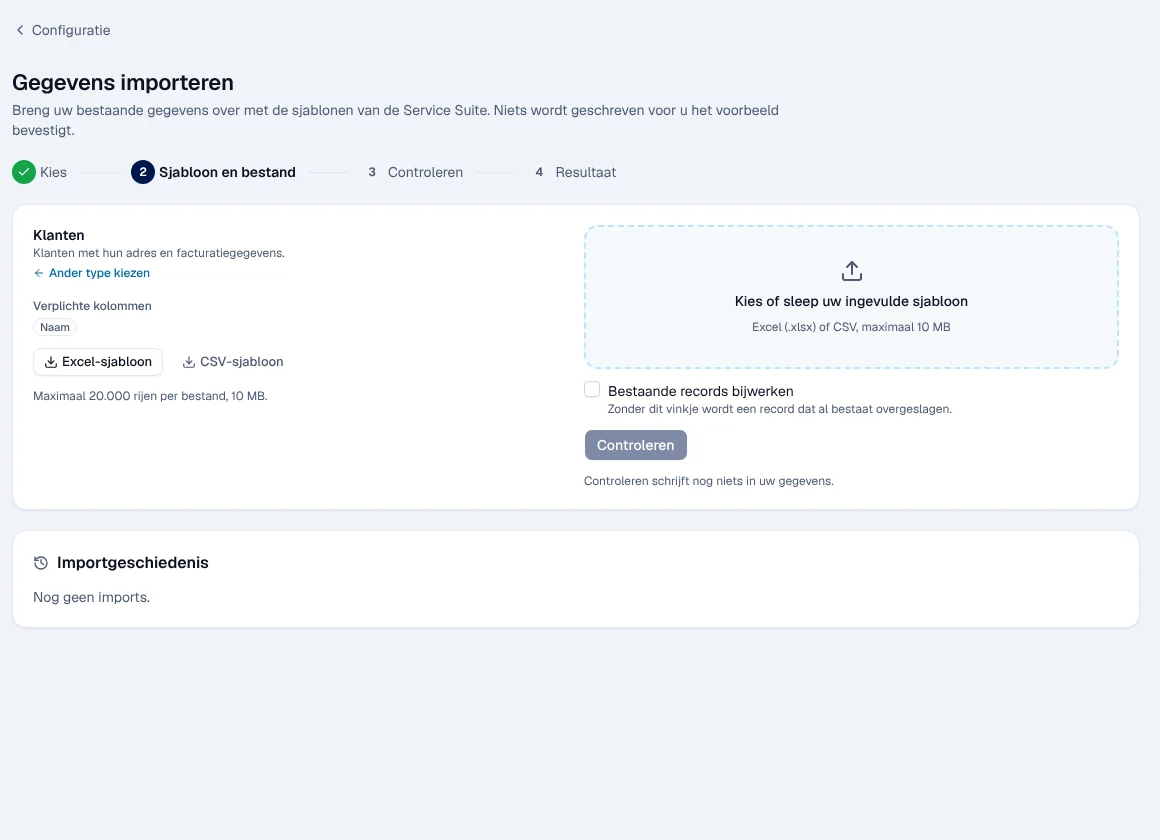
Sjabloon en bestand (template and file): download the template with Excel-sjabloon or CSV-sjabloon. The Verplichte kolommen (required columns) list shows what must be filled in.
-
Fill in the template, then drop it in Kies of sleep uw ingevulde sjabloon (choose or drag your completed template): an Excel (.xlsx) or CSV file of 10 MB at most.
-
Tick Bestaande records bijwerken (update existing records) if you want to change what already exists. Without this box, a row that already exists is skipped.
-
Click Controleren (check). The check does not write anything to your data yet.
-
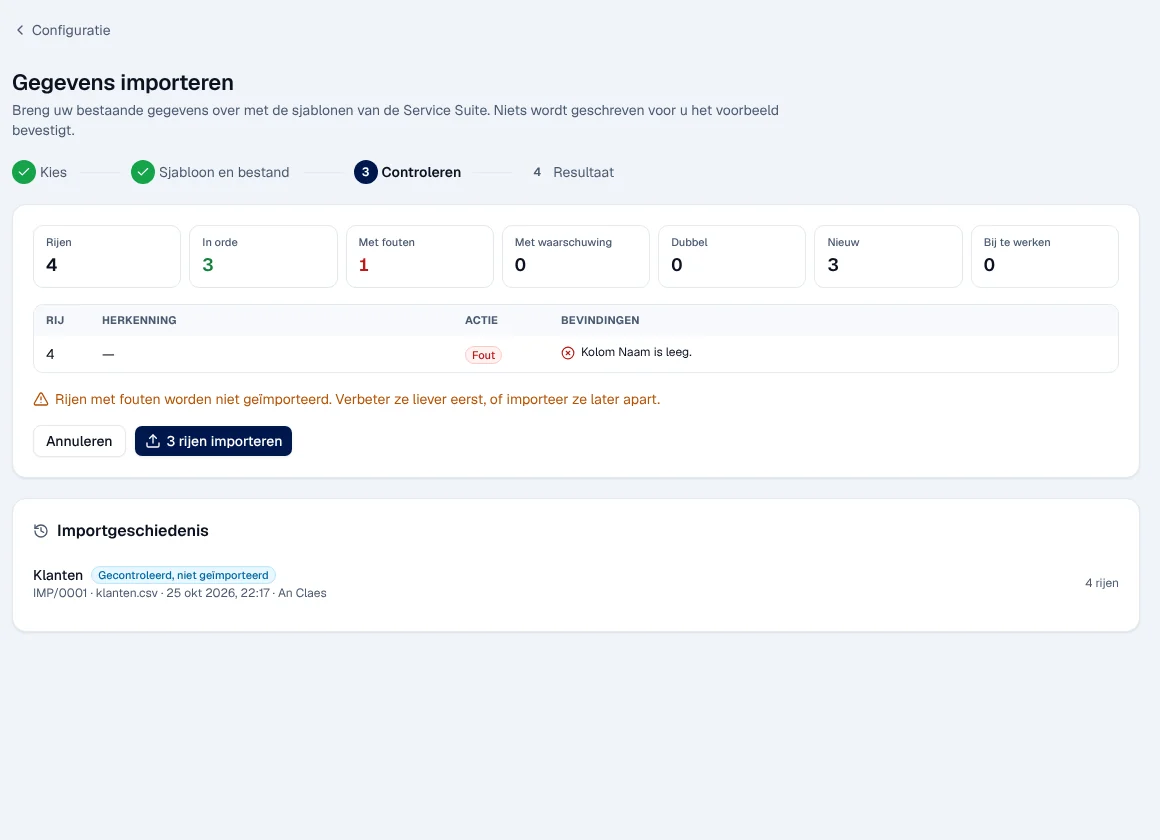
Controleren: read the figures — Rijen (rows), In orde (correct), Met fouten (with errors), Met waarschuwing (with a warning), Dubbel (duplicates), Nieuw (new), Bij te werken (to update) — and the table of rows to review, with the reason for each one.
-
Click N rijen importeren (import N rows), then confirm with Importeren.

Result: the Resultaat (result) step shows “Import gelukt” (import successful), “Gedeeltelijk geïmporteerd” (partly imported) or “Import mislukt” (import failed), with a report. Rows with errors are not imported: correct them in your file and import them separately afterwards.
Other cases:
- “De gegevens zijn intussen gewijzigd”: the data has changed since the check; run the check again.
- An import that takes more than 20 minutes stops without writing anything.
- Annuleren (cancel) or Ander type kiezen (choose another type) leaves the import without writing anything.
The import history
Section titled “The import history”The Importgeschiedenis (import history) block lists each import with its number, the file, the date, the author and the number of rows. Statuses: Gelukt (successful), Gedeeltelijk (partial), Mislukt (failed), Geannuleerd (cancelled), Gecontroleerd, niet geïmporteerd (checked, not imported), Concept (draft) and Bezig (in progress). An import belongs to the person who started it: “Deze import hoort bij een andere gebruiker.”.
Limits per file
Section titled “Limits per file”| Limit | Value |
|---|---|
| Formats | Excel (.xlsx) or CSV |
| Size | 10 MB at most |
| Rows | a maximum per data type, shown below the templates (for example 20,000 rows for customers) |
Rights by role
Section titled “Rights by role”Import has three separate permissions, visible in Instellingen › Profiel › Rechten. The table shows the supplied role templates (see Roles and permissions); your administrator can adjust them (see Users, roles and permissions).
| Action | Admin |
|---|---|
| Open the screen, download the templates, see the history (“Imports en sjablonen bekijken”) | ✓ |
| Drop a file and run Controleren (“Een import controleren”) | ✓ |
| Write the rows with Importeren (“Een import uitvoeren”) | ✓ |
If you do not see the screen, ask your administrator for these permissions.
Current limits
Section titled “Current limits”- No automatic undo of an import: correct the data in the relevant lists.
- Always use the template downloaded from the screen: it contains the expected columns.
See also
Section titled “See also”- Getting started: Aan de slag — first customer, site, installation
- Customers and the 360° customer file
- Sites (Locaties)
- Installations
- The warehouse — items and opening stock