

Interventions: list and creation
The Interventies (interventions) list brings together all your company’s work: repairs, maintenance, installations, inspections. The office uses it to follow the work, find an intervention, create one and act on several interventions at once. The technician finds their own work in the Techniekers-app.
| Menu | Werk › Interventies |
| Who | View: most roles (table at the bottom of the page). Create, assign, schedule: administrator, manager, planner. |
| Prerequisites | To create: a customer with at least one site (Locatie). The installation is optional. |
Find an intervention
Section titled “Find an intervention”-
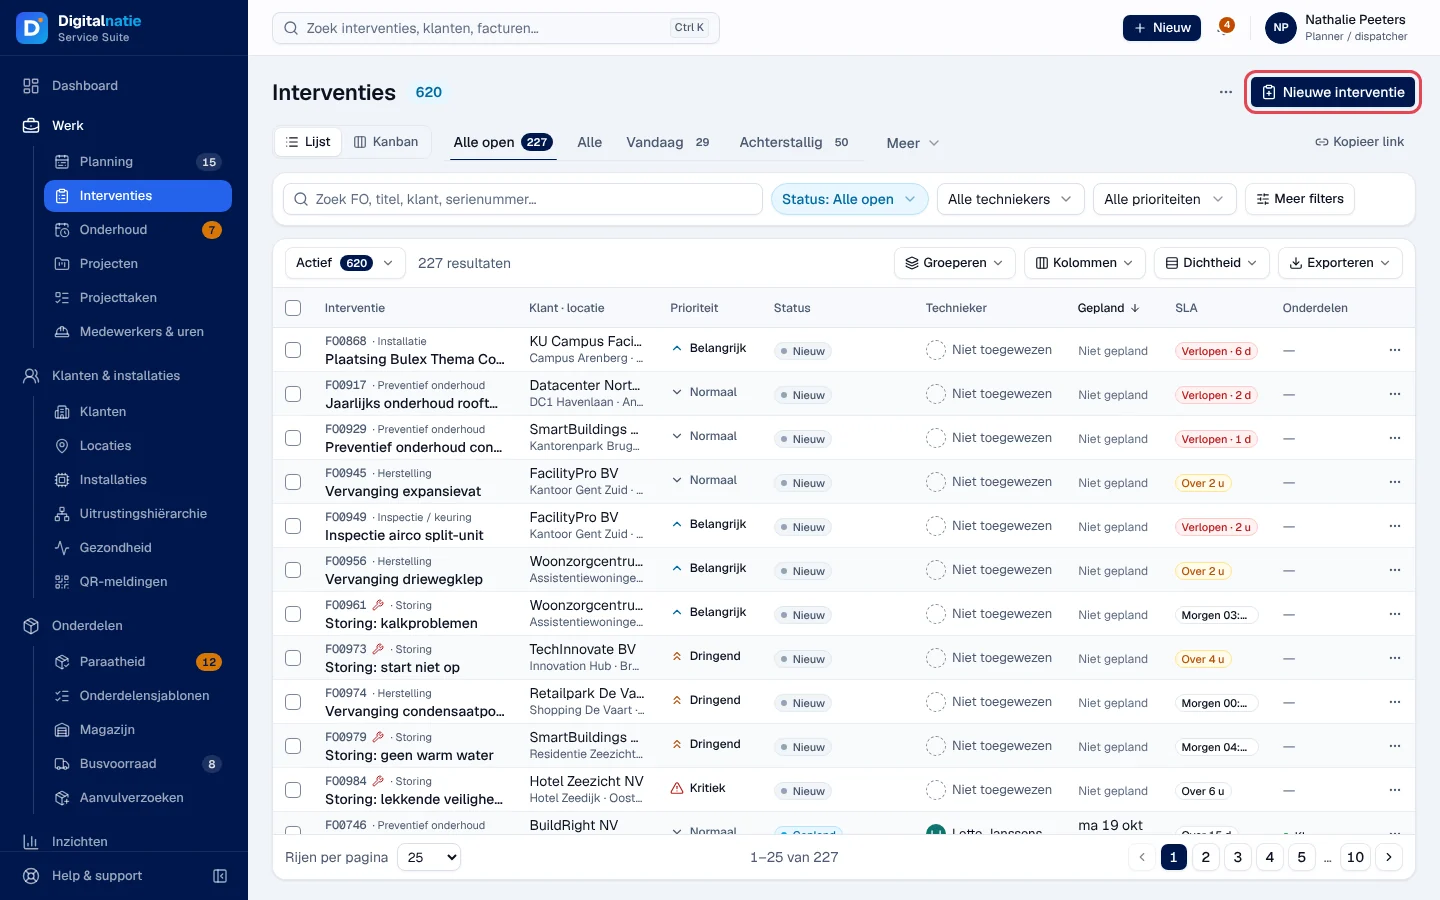
Open Werk › Interventies. The number next to the title counts the active interventions.
-
Choose a view. The first tab is your default view, followed by Alle (all), Mijn werk (my work, if your account is linked to a technician), Vandaag (today) and Achterstallig (overdue). The other views are under Meer (more): Alle open (all open), Niet toegewezen (unassigned), Dringend & achterstallig (urgent and overdue), Open storingen (open breakdowns), Wacht op onderdelen (waiting for parts), Te factureren (to invoice), Afgewerkt, rapport niet verzonden (completed, report not sent). Each view shows its count. Niet toegewezen also counts the open interventions still on an archived technician.
-
Type in the search box “Zoek FO, titel, klant, serienummer…”: an FO number, a title, a customer or a serial number.
-
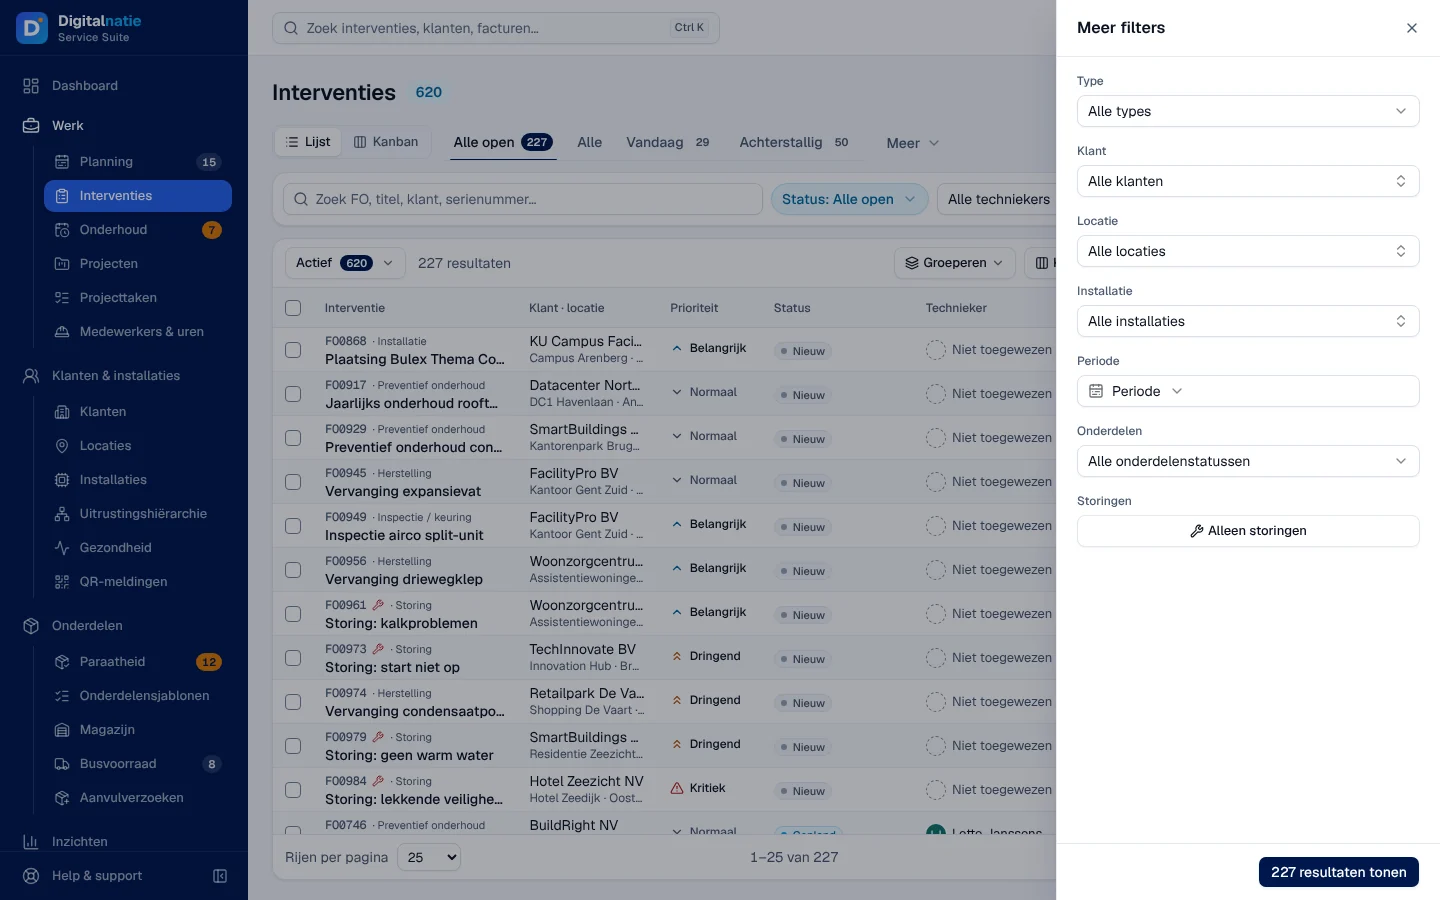
Filter with Status, Technieker (technician) and Prioriteit (priority). Meer filters (more filters) adds Type, Klant (customer), Locatie (site), Installatie (installation), Periode (period), Onderdelen (parts status) and Alleen storingen (breakdowns only). Confirm with the button that shows the number of results.
-
Click a row to open the intervention record.
Result: the active filters are shown as chips under the search bar; Filters wissen (clear filters) removes them. Kopieer link (copy link) copies the view’s address, so you can send it to a colleague.
Above the rows:
- Actief (active) opens the choice Gearchiveerd (archived) or Alles (everything).
- Groeperen (group) by Technieker, Klant or Type.
- Kolommen (columns) and Dichtheid (density) adjust the display. The Type, Installatie, Contract, Handtekening (signature), Facturatie (invoicing) and Duur (duration) columns are hidden by default. Facturatie shows Gefactureerd (invoiced), Niet gefactureerd (not invoiced) or Gedekt door contract (a maintenance visit covered by its contract, nothing to invoice).
- Exporteren (export) creates a CSV file of the visible columns: Deze pagina (this page) or Alle resultaten (all results). Above 10,000 rows, the application asks for confirmation; above 50,000, it refuses.
When you hover over a row: Toewijzen (assign), Inplannen (schedule) and Voorbeeld (read-only preview). The ⋯ menu also offers Openen (open), Rapport (PDF) for a completed intervention, Kopieer link and Archiveren (archive), only possible for a completed or cancelled intervention. An archived intervention is put back with Terugzetten (restore); see also Archive.
Create an intervention
Section titled “Create an intervention”
-
Click Nieuwe interventie (new intervention) at the top right of the list. From any screen, you can also use Nieuw › Interventie in the top bar.
-
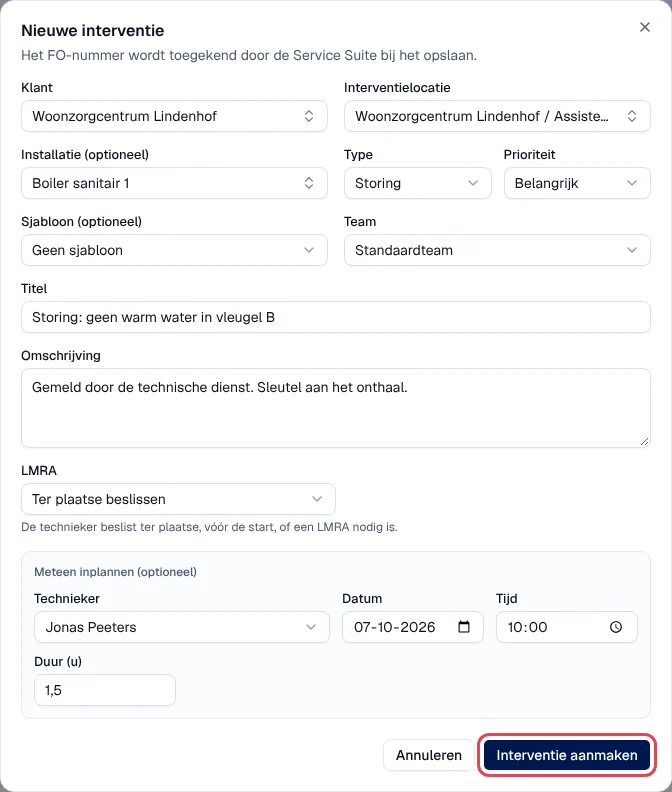
Fill in the Nieuwe interventie window:
- Klant (customer), required. Changing the customer clears the site and the installation.
- Interventielocatie (intervention site), required. If the customer does not have a site yet, the application shows “Deze klant heeft nog geen locatie.” (this customer has no site yet) and, if your role allows it, Locatie aanmaken (create a site).
- Installatie (optioneel): the installation concerned on this site.
- Type, required. By default, the breakdown type (Storing).
- Prioriteit: Normaal, Belangrijk (default), Dringend or Kritiek.
- Sjabloon (optioneel) (template): fills in the template’s type, team, duration and instructions. You can still change them.
- Team: only visible if there are several teams.
- Titel (title): from 3 to 120 characters, for example “Storing: geen warm water”.
- Omschrijving (description): what the customer reports, access, keys, the contact person.
- LMRA (last-minute risk analysis): Ter plaatse beslissen (decide on site, default), Vereist (required) or Niet vereist (not required). See Safety: LMRA, PPE, documents.
-
To schedule straight away, fill in the Meteen inplannen (optioneel) (schedule straight away) block: Technieker, Datum (date), Tijd (time, in quarter hours) and Duur (u) (duration in hours, from 0.25 to 12). A technician requires a date and a time. Leave Later toewijzen (assign later) to schedule afterwards on the schedule.
-
Click Interventie aanmaken (create intervention).
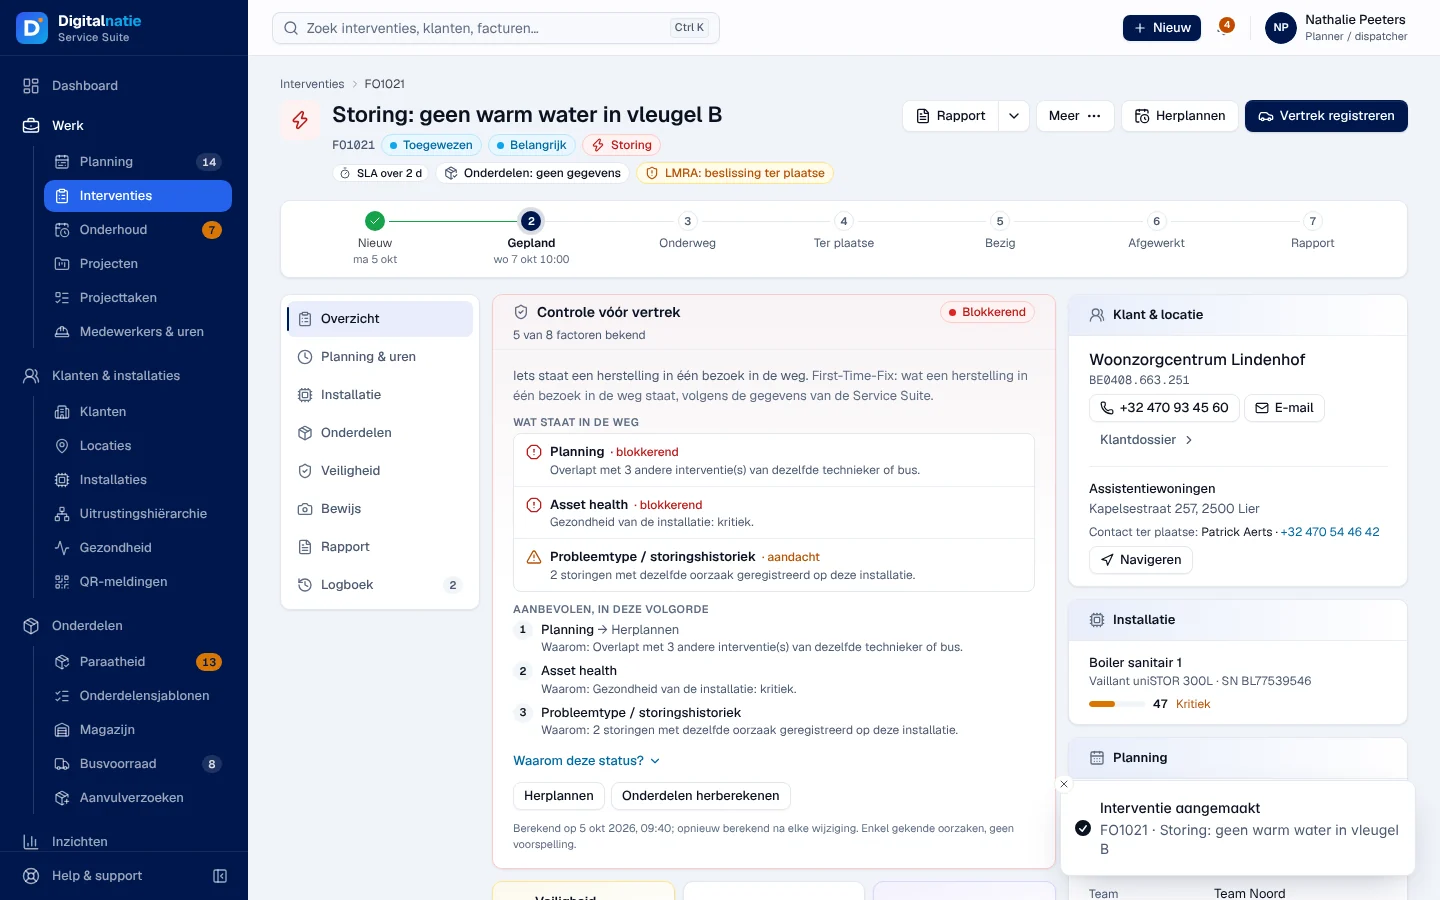
Result: the “Interventie aangemaakt” (intervention created) message shows the FO number and the title, then the new intervention’s record opens. The FO number is assigned by the Service Suite when it is saved.
Other starting points
Section titled “Other starting points”The same window opens, already filled in, from other screens:
| Where | Button | Already filled in |
|---|---|---|
| Customer file | Nieuw › Interventie, Interventie plannen, Interventie aanmaken on a site | customer (and site) |
| Site page | Nieuwe interventie | customer, site |
| Installation record or list | Storing melden (report a breakdown), Interventie plannen, Onderhoud plannen | customer, site, installation |
| Maintenance contract | Bezoek inplannen (schedule a visit) | customer, site, installation, preventive type, date of the next visit, link to the contract |
| Service Inbox, Mailbox | Interventie aanmaken | customer, title and description taken from the e-mail (Service Inbox and Mailbox) |
An intervention can also come from a QR report, a confirmed quote or a follow-up (Opvolging aanmaken) on the intervention record.
Assign and send reports in bulk
Section titled “Assign and send reports in bulk”-
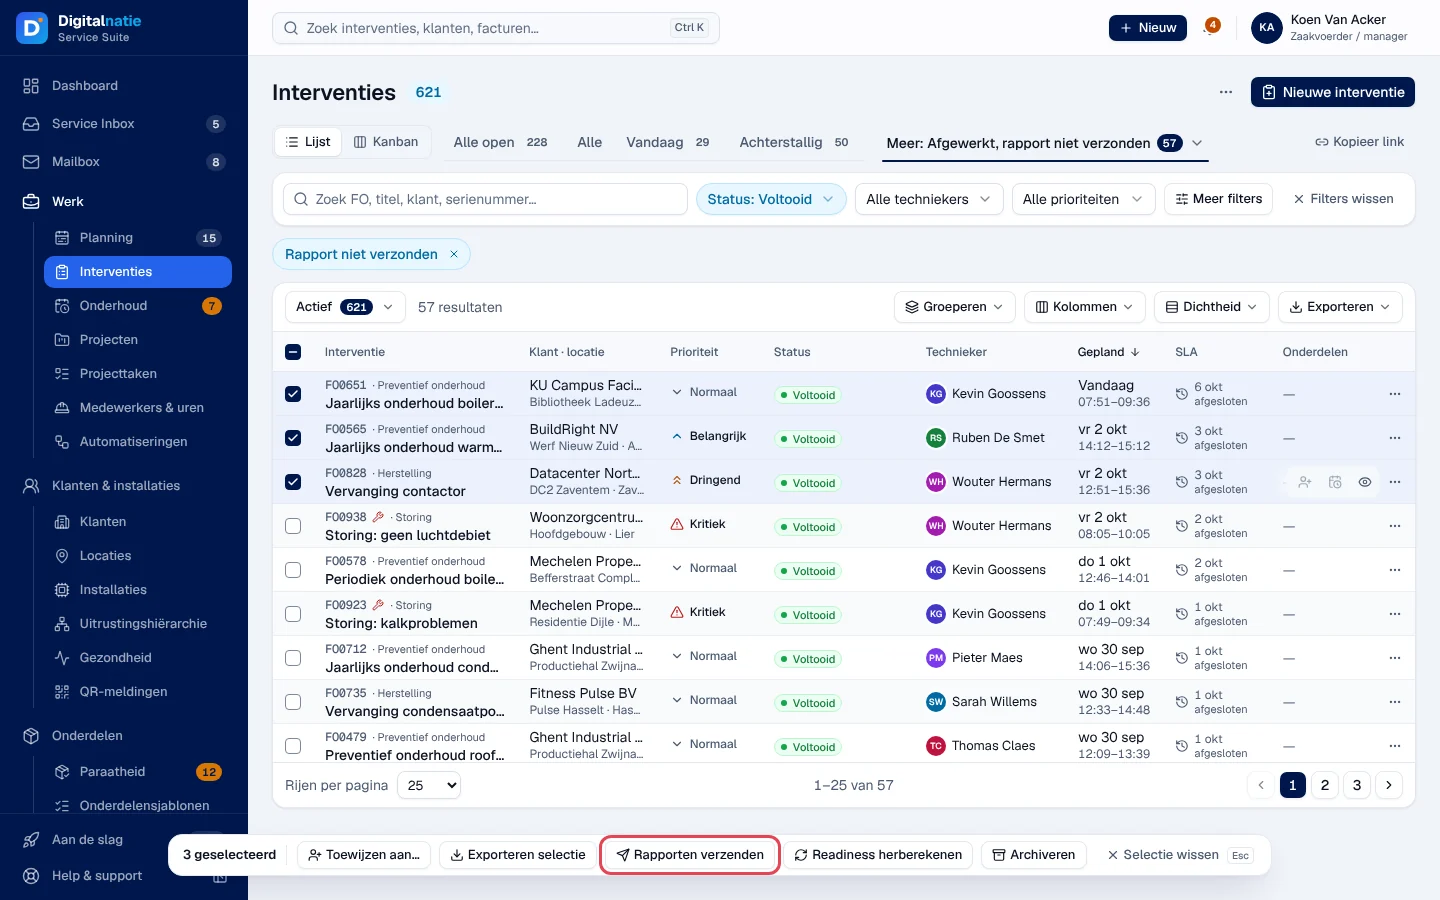
Tick the rows you want. A bar appears at the bottom of the screen: Toewijzen aan… (assign to), Exporteren selectie (export selection), Rapporten verzenden (send reports), Readiness herberekenen (recalculate parts readiness), Archiveren and Selectie wissen (clear selection).
-
Toewijzen aan…: choose a technician. The message shows how many interventions were assigned to them and how many were refused (“geweigerd”), with the reason.
-
Rapporten verzenden: the window lists each intervention and its customer. Only Voltooid (completed) interventions are sent; the others are marked “Overgeslagen: niet voltooid” (skipped: not completed). Confirm with the 3 rapporten verzenden button (the number varies).
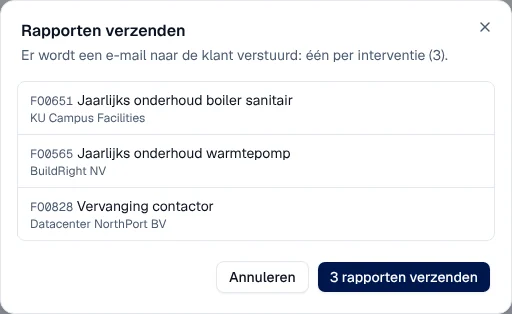
Result: the window shows “Verzonden” (sent) or the reason for refusal for each row, then the message “3 rapporten verzonden”.
The Kanban board
Section titled “The Kanban board”The Lijst · Kanban switch shows the interventions in columns: Nieuw (new), Gepland (scheduled), In het veld (in the field), Aandacht (attention), Voltooid and Geannuleerd (cancelled), the last two collapsed.
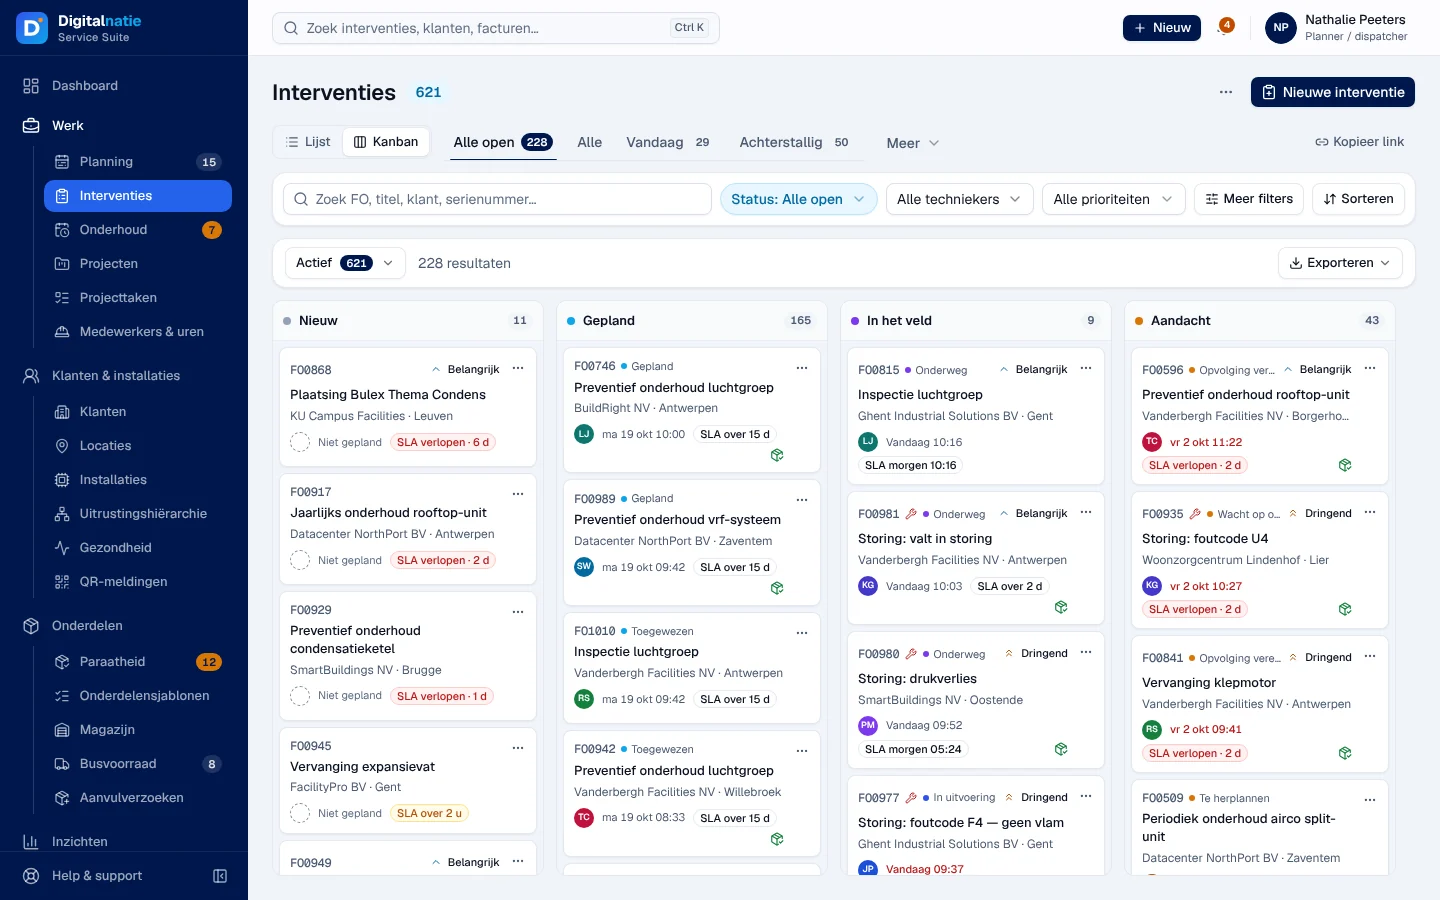
Only one move has an effect: dropping a card on Gepland opens the scheduling window. Other moves are refused with a message that says where to do the action, for example “Annuleren doet u in de werkruimte, met een reden.” (you cancel in the record, with a reason), and the Werkruimte openen (open the record) button.
On a phone
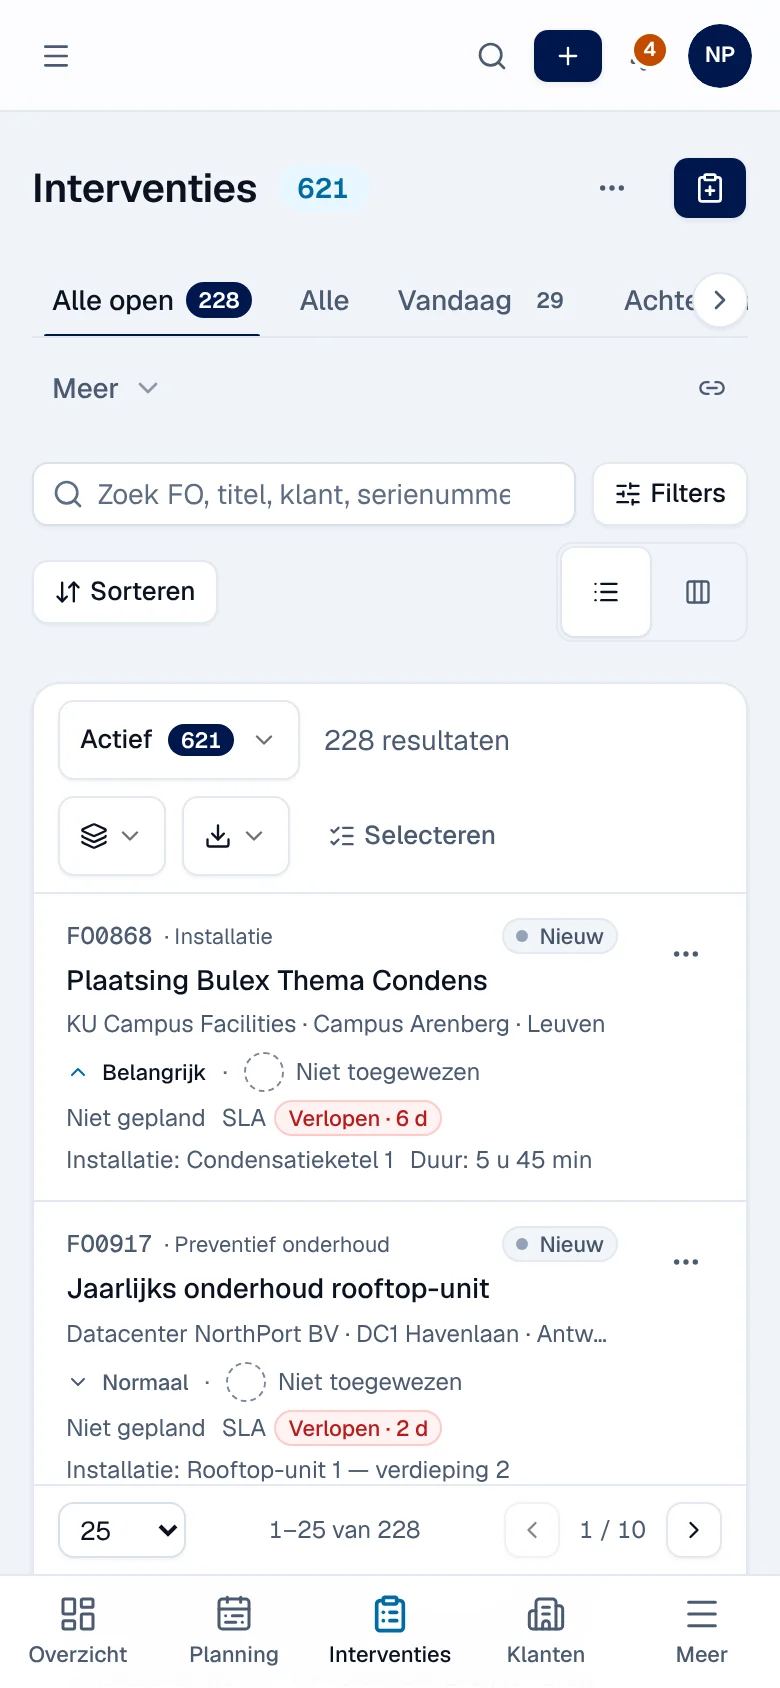
Section titled “On a phone”The list becomes a stack of cards with all the fields. Filters opens the filters, Sorteren (sort) changes the order and Selecteren (select) lets you tick cards.
Rights by role
Section titled “Rights by role”The table shows the supplied role templates (see Roles and permissions); your administrator can adapt them (see Users, roles and permissions).
| Action | Admin | Manager | Planner | Accounting | Sales | Read |
|---|---|---|---|---|---|---|
| View the list | ✓ | ✓ | ✓ | ✓ | ✓ ¹ | ✓ |
| Create an intervention | ✓ | ✓ | ✓ | — | — | — |
| Assign, schedule, select | ✓ | ✓ | ✓ | — | — | — |
| Send reports in bulk | ✓ | ✓ | ✓ | — | — | — |
| Archive, restore | ✓ | ✓ | ✓ | — | — | — |
¹ Directie only, read-only.
A technician with no other role does not open the office application: they find their work in the Techniekers-app.
Current limits
Section titled “Current limits”- An intervention cannot be deleted: you cancel it from the record, or archive it once completed.
- The Kanban board does not change statuses: only the Gepland column reacts.
- Export: 50,000 rows maximum.
See also
Section titled “See also”- The intervention record: steps, report, corrections, invoice.
- The schedule: schedule by drag and drop.
- Carrying out an intervention: the technician’s side.