

Projects and tasks
An installation project groups the work of an order into several stages: the tasks, the interventions, the installations and the quotes. Each task has a technician and a deadline; the project’s progress follows the completed tasks. The office schedules and follows up, the technician sees their tasks in their app.
| Menu | Werk › Projecten (projects) and Werk › Projecttaken (project tasks) |
| Who | View: all office users. Create and manage projects: administrator and manager; create and edit tasks: also Planner / Scheduler (planner) (see the table at the bottom of the page). |
| Prerequisites | None. The customer and the site are optional, but useful for linking interventions and quotes. |
Follow projects
Section titled “Follow projects”-
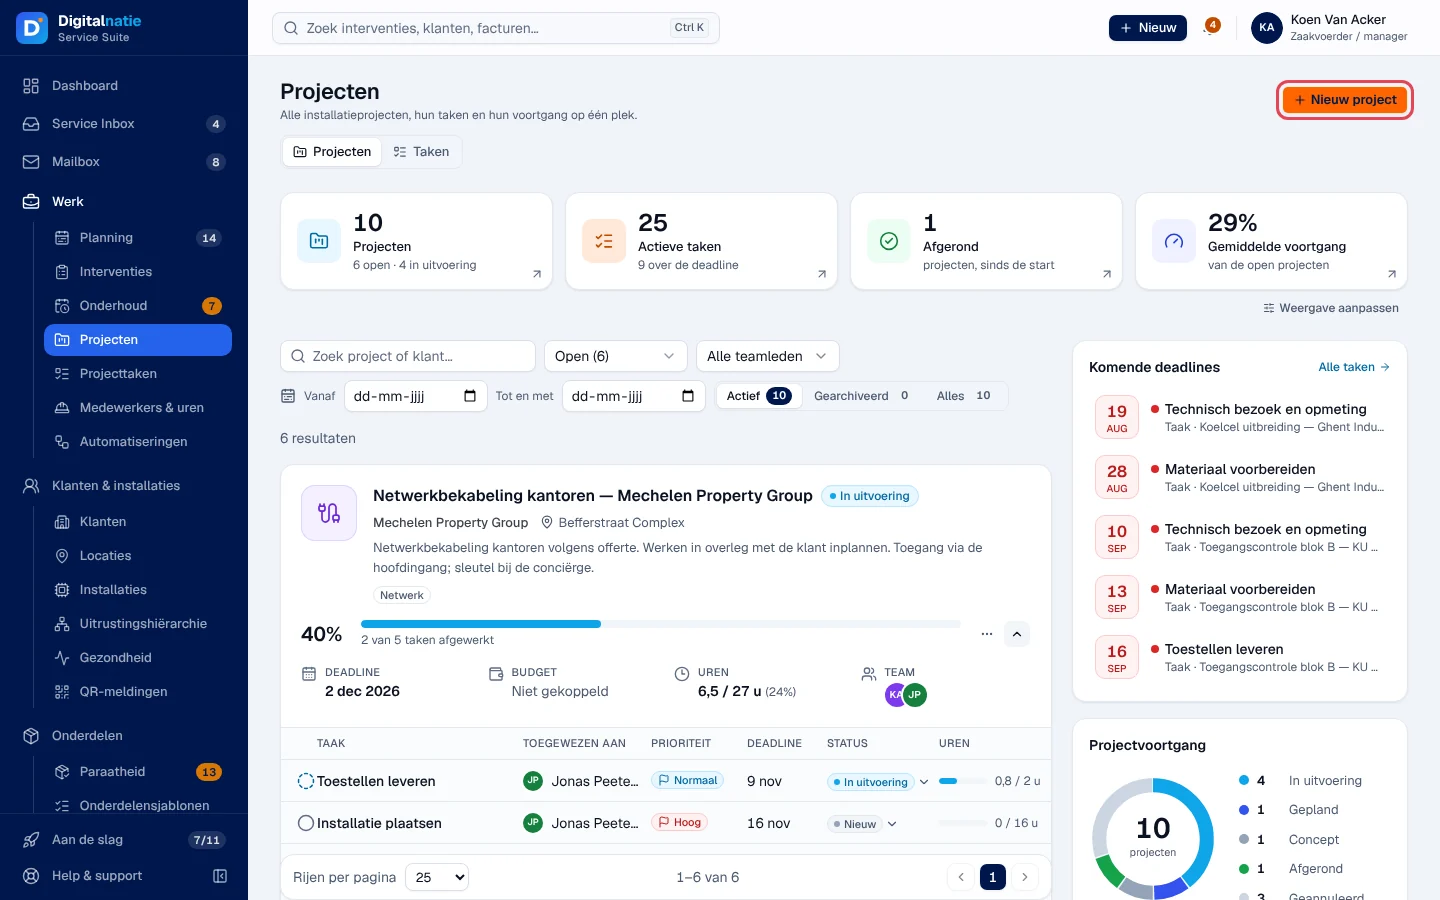
Open Werk › Projecten. The switch at the top toggles between Projecten (projects) and Taken (tasks).
-
Read the key figures: Projecten (open and in progress), Actieve taken (active tasks, including those past their deadline), Afgerond (completed) and Gemiddelde voortgang (average progress of open projects).
-
Filter by search (“Zoek project of klant…”), status, team member and period. Actief, Gearchiveerd and Alles choose between active, archived or all projects.
-
Each card shows the progress in %, “x van y taken afgewerkt” (tasks completed), the deadline, the hours and the team. The arrow expands the project’s task list; the ⋯ menu offers Project openen, Klant openen (open the customer), Taak toevoegen… (add a task), Planning wijzigen… (change the dates) and Archiveren….
On the right: Komende deadlines (upcoming deadlines), Projectvoortgang (projects by status) and the recent activities. The Budget box shows “Niet gekoppeld”: the budget is not tracked in the application.
Create a project
Section titled “Create a project”
-
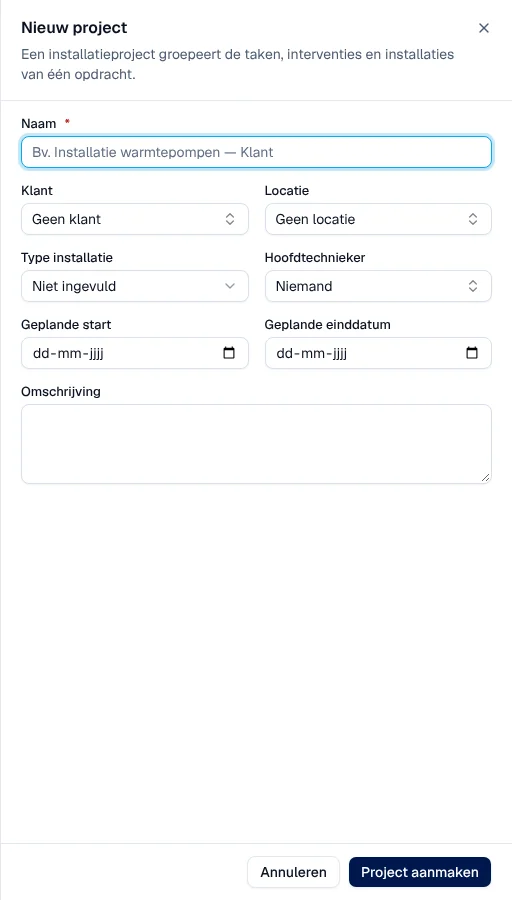
Click Nieuw project (new project).
-
Fill in Naam (name, required), Klant (customer), Locatie (site), Type installatie (Elektriciteit, Sanitair, HVAC / airco, Beveiliging, Netwerk / IT, Algemene installatie, Overig), Hoofdtechnieker (lead technician), Geplande start and Geplande einddatum (planned dates) and Omschrijving (description).
-
Click Project aanmaken (create project).
Result: the project page opens. A project can also start from a confirmed sales order (Project aanmaken, see Quotes).
Add tasks
Section titled “Add tasks”-
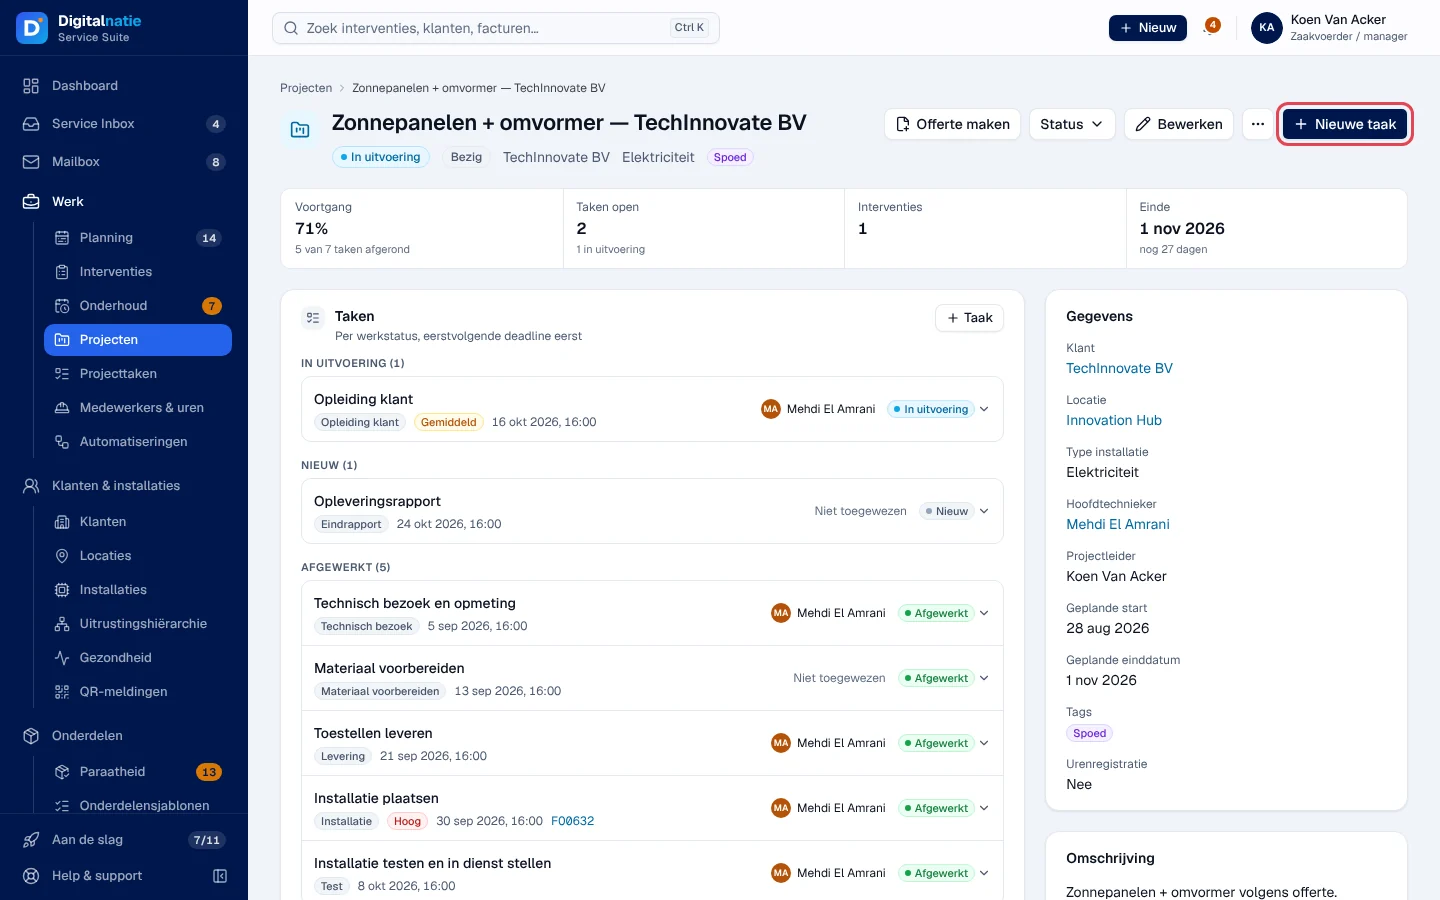
On the project page, click Nieuwe taak (new task) or + Taak in the Taken block.
-
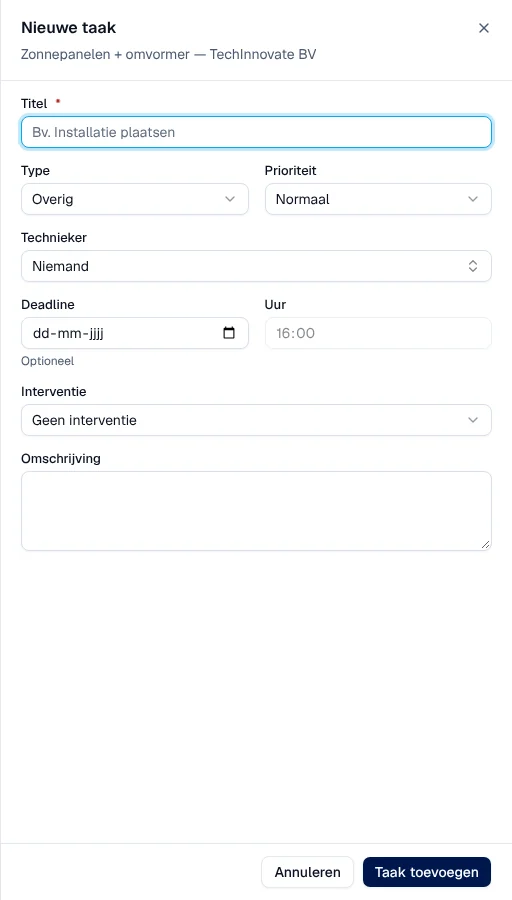
Fill in Titel (title, required), Type (Technisch bezoek, Materiaal voorbereiden, Levering, Installatie, Test, Opleiding klant, Eindrapport, Facturatie, Overig), Prioriteit (priority), Technieker, Deadline and Uur (time), optionally Interventie (a linked intervention) and Omschrijving.
-
Click Taak toevoegen (add task).
Result: the task appears in Taken, sorted by status, nearest deadline first. The technician sees it in their app (see Agenda, tasks and messages).
Change the project status
Section titled “Change the project status”Click Status at the top of the project page, then choose under Projectstatus: Concept (draft), Gepland (scheduled), In uitvoering (in progress), Afgerond (completed) or Geannuleerd (cancelled). If your organisation uses project phases, the same menu also offers a Fase (phase).
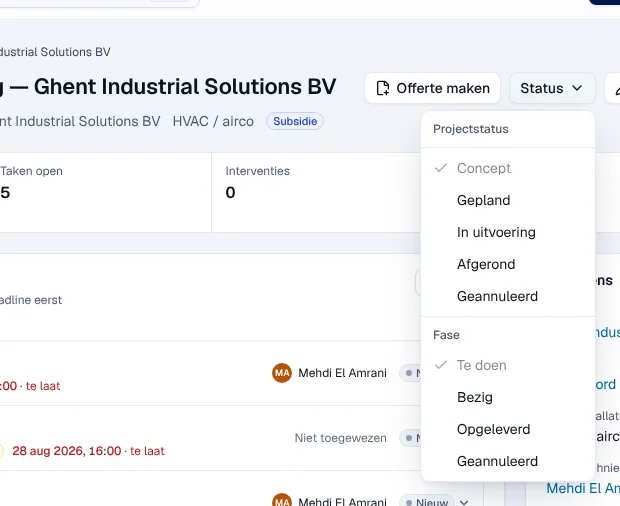
Bewerken (edit) changes the project data. ⋯ › Archiveren removes the project and its tasks from the lists and the dashboard; the Gearchiveerd filter lets you restore it (Herstellen).
Follow and update tasks
Section titled “Follow and update tasks”-
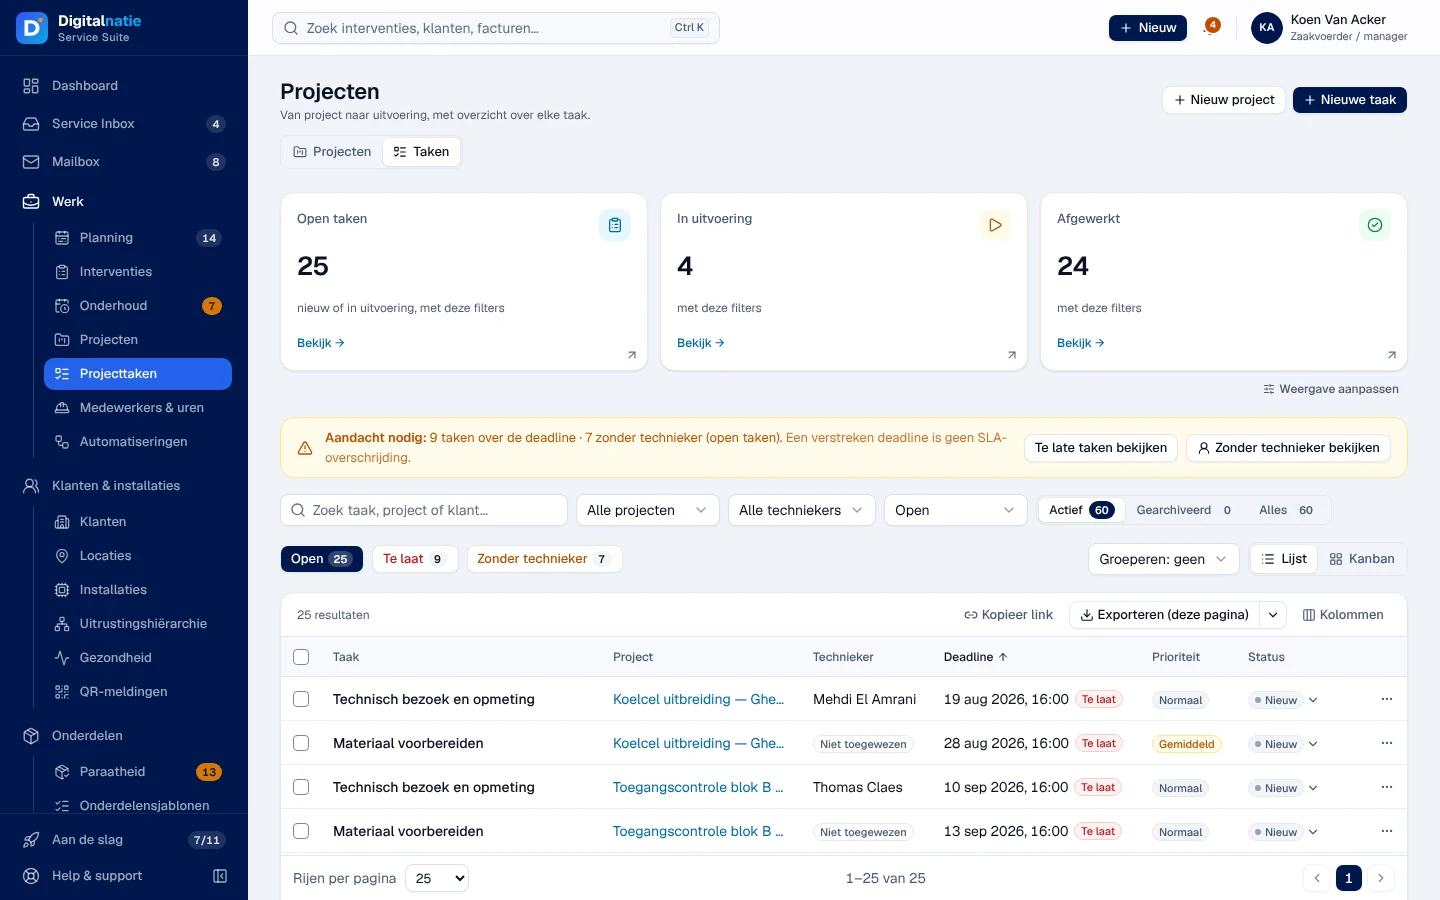
Open Werk › Projecttaken, or Taken in the switch.
-
The Aandacht nodig (attention needed) banner counts the overdue tasks and those without a technician; its buttons filter the list. The Open, Te laat (overdue) and Zonder technieker (without technician) shortcuts do the same.
-
Choose Lijst (list) or Kanban (columns Nieuw, In uitvoering, Afgewerkt, Geannuleerd), and Groeperen to group by project.
-
Click a task: the panel on the right offers Technieker toewijzen (assign), Deadline wijzigen (change the deadline), Interventie koppelen (link an intervention) and Status wijzigen (change the status).
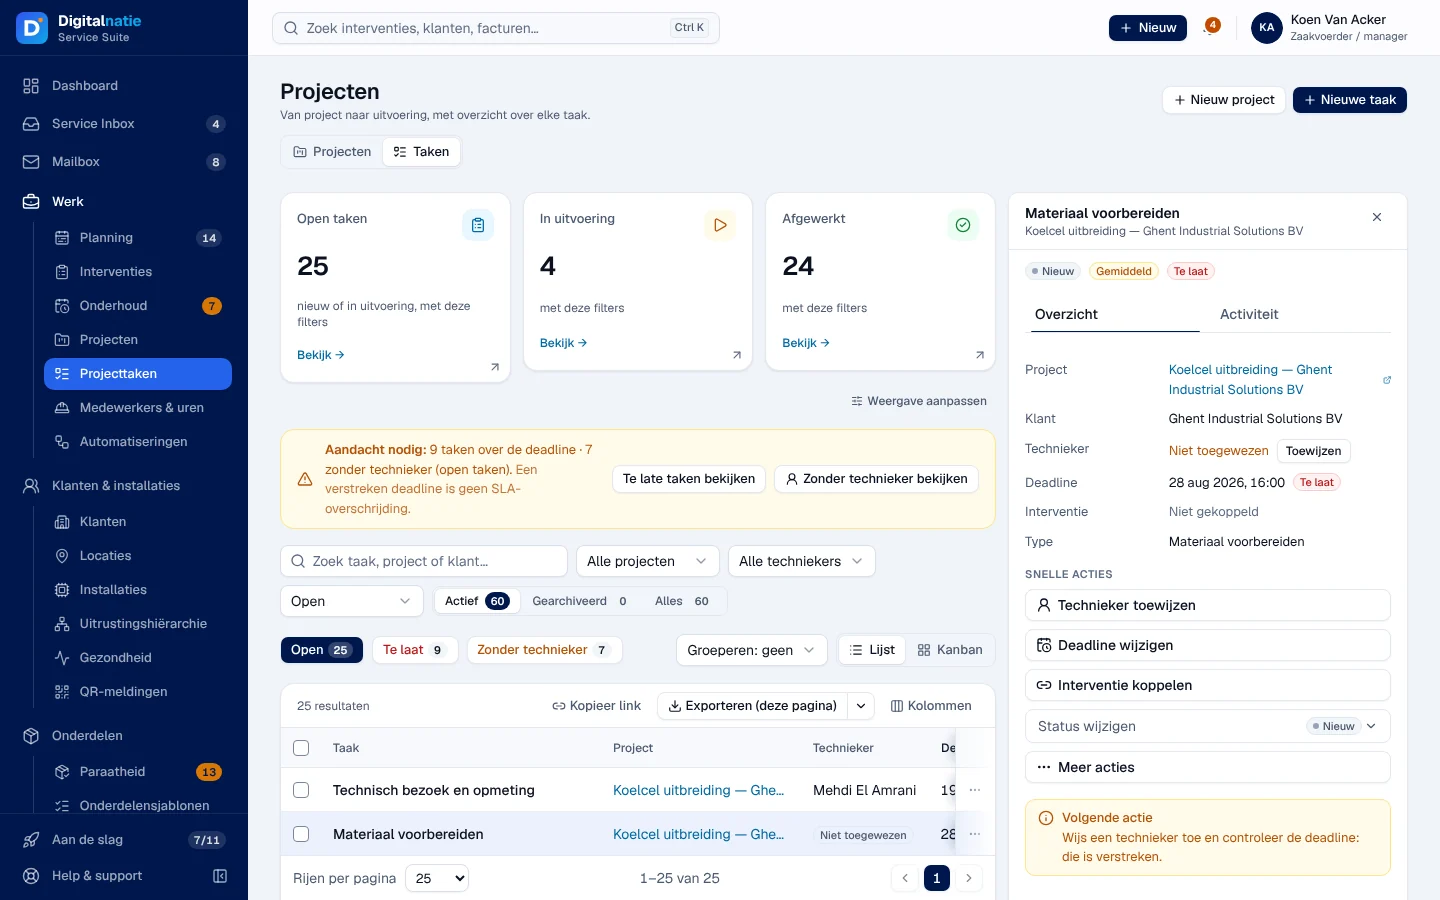
The assigned technician can also move their own task forward from their app; the project’s progress updates at the office.
Rights by role
Section titled “Rights by role”The table shows the supplied role templates (see Roles and permissions); your administrator can adapt them (see Users, roles and permissions).
| Action | Admin | Manager | Planner | Accounting | Warehouse | Sales | Read |
|---|---|---|---|---|---|---|---|
| View projects and tasks | ✓ | ✓ | ✓ | ✓ | ✓ | ✓ | ✓ |
| Note or activity on a task | ✓ | ✓ | ✓ | ✓ | ✓ | ✓ | ✓ |
| Move your own task forward (assigned technician) | ✓ | ✓ | ✓ | ✓ | ✓ | ✓ | ✓ |
| Create, edit, move a task; link an intervention ¹ | ✓ | ✓ | ✓ ² | — | — | — | — |
| Create, edit, archive a project; change its status | ✓ | ✓ | — | — | — | — | — |
¹ Linking an intervention also requires the permission to edit interventions. ² Planner / Scheduler only.
Current limits
Section titled “Current limits”- A project’s budget is not tracked (“Niet gekoppeld”).
- Phases (Fase) and milestones (Mijlpalen) only appear if your organisation uses them.
See also
Section titled “See also”- Quotes — Offerte maken from a project, or a project from a sales order.
- Interventions: list and creation
- Agenda, tasks and messages — tasks on the technician’s side.